Upgrade Your Car with Aeroflow Dynamics Diffuser | Easy Installation & Stylish Look
Upgrade Your Ride with Aeroflow Dynamics Diffuser: Installation and Style Benefits
When it comes to enhancing the performance and aesthetic appeal of your car, small modifications can make a big difference. One such upgrade that brings both style and functional benefits is the installation of an Aeroflow Dynamics Diffuser. Not only do these diffusers provide a sleek, aggressive look to your vehicle, but they also help improve aerodynamics. Let's dive into how these diffusers work and the simple process to install them with hardware, 3M tape, and self-tapping screws.
What is an Aeroflow Dynamics Diffuser?
An Aeroflow Dynamics Diffuser is a performance part designed to be installed at the rear of your car. These diffusers are engineered to direct airflow under the car, reducing drag and increasing downforce. By improving airflow, they can help keep your car more stable at higher speeds, offering better traction and performance on the road or track.
While the performance benefits are key, these diffusers are also an excellent way to elevate the overall look of your car. The aggressive and sporty design of the diffuser adds a touch of racing style that complements any vehicle.
How Does It Add a Great Look to Your Car?
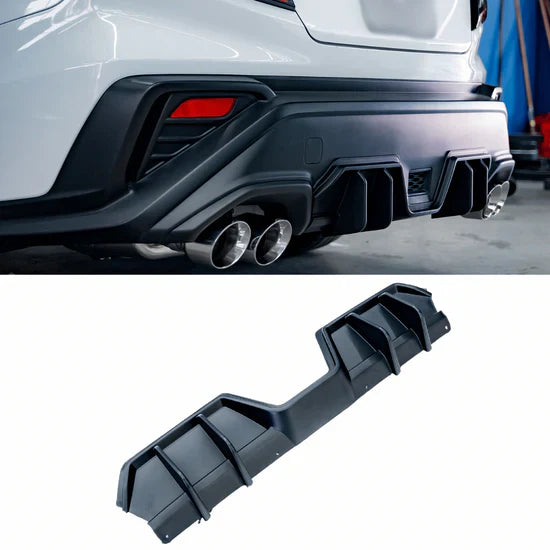
The sleek, angular lines of the Aeroflow Dynamics Diffuser immediately transform the rear end of your car, making it look more dynamic and purposeful. Whether you’re cruising down the street or taking your car to a show, the added aerodynamic flair creates an eye-catching contrast, drawing attention to the rear bumper.
Not only does it give your car a more sophisticated and aggressive appearance, but the diffuser enhances the overall aesthetic of your vehicle’s body kit and adds a sense of speed even when parked. It’s a subtle yet impactful modification that blends form and function.
Easy Installation with 3M Tape and Self-Tapping Screws
One of the best features of the Aeroflow Dynamics Diffuser is its user-friendly installation process. You can easily mount it yourself with minimal effort and tools. The diffuser can be installed using a combination of 3M Automotive Double-Sided Tape and self-tapping screws to ensure a secure fit.
Here’s a step-by-step guide on how to install the diffuser:
Materials Needed:
- Aeroflow Dynamics Diffuser
- 3M Automotive Double-Sided Tape (high-strength)
- Self-tapping screws
- Drill with drill bits (for self-tapping screws)
- Clean Cloth
- Isopropyl Alcohol (to clean the surface)
- Measuring Tape (optional)
- Scissors (for trimming tape)
Installation Steps:
-
Prepare the Area:
- Start by thoroughly cleaning the rear bumper of your car. Use a clean cloth and isopropyl alcohol to remove any dirt, oil, or wax. This will ensure a strong adhesive bond when you apply the 3M tape.
-
Align the Diffuser:
- Before sticking or screwing the diffuser into place, test-fit it on your car. Align it properly with the edges of the rear bumper. Use measuring tape to make sure the diffuser is centered and aligned symmetrically on both sides.
-
Apply the 3M Tape:
- Cut the 3M tape into small strips and apply them to the backside of the diffuser. Place the tape along the edges and across the middle of the diffuser to ensure an even and secure fit. The tape should be applied in a way that provides maximum contact with the bumper.
-
Drill Holes for Screws (Optional):
- If you want extra security, you can use self-tapping screws in addition to the 3M tape. Mark the spots where you need to drill holes in the rear bumper. Be sure to drill carefully and ensure the holes align perfectly with the diffuser's mounting points.
-
Install the Self-Tapping Screws:
- Once the holes are drilled, use self-tapping screws to securely attach the diffuser to the bumper. The screws will ensure the diffuser is firmly attached and will stay in place, even at high speeds.
-
Mount the Diffuser:
- Carefully peel off the protective backing from the 3M tape and position the diffuser against the bumper. Press down firmly for about 30 seconds to ensure that the adhesive bonds strongly. Tighten the self-tapping screws and press to secure the diffuser fully.
-
Check for Firmness:
- Once mounted, give the diffuser a gentle pull to check that it is securely in place. If you feel any resistance, that’s a sign the adhesive and screws have fully bonded. Allow the tape to cure for a few hours for the best results.
And that’s it! Your new Aeroflow Dynamics Diffuser is now installed and ready to take your car’s look and performance to the next level.
Why Choose Aeroflow Dynamics Diffusers?
-
Quality Materials: Aeroflow Dynamics diffusers are built from durable materials that are lightweight and resistant to harsh weather conditions.
-
Improved Aerodynamics: By channeling air more effectively, the diffuser helps increase stability at high speeds, reducing drag and enhancing downforce.
-
Simple Installation: With the use of 3M tape and self-tapping screws, installation is simple and doesn’t require drilling or any special tools, though screws provide extra security.
-
Aesthetic Appeal: The diffuser adds an aggressive, racing-inspired look to your car, making it stand out on the road or at car shows